|


|
|

|
|
|
|
|
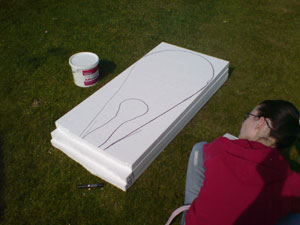
"I always begin by taking as many screen shots of the character as possible so I know the prop inside out then making sketches of ideas I have on how to build it. If you look at this pic they don't have to be detailed to gather an idea of how it will work - the red is my friend Alex (who'll wear the finished arm), the blue is the sleeve which will go over the arm and up to Alex's shoulder allowing him to move his arm, and the black will be the forearm and claw. This will be made out of polystyrene covered with fibreglass."
"I went to my local hardware store and had a look at the polystyrene
sheets in person to determine their size and to decide how many I
needed. I bought 2 Sheets of 2400 x 600 x 50mm which is
usually sold as insulation, I decided that the sheets were twice the
length I needed (plus they wouldn't fit in my car!) so I cut them in
half and got them home.
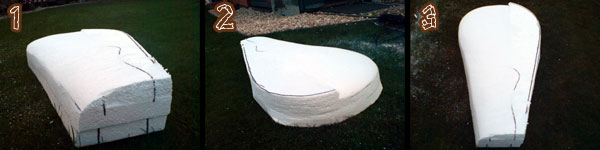
"Once I was happy with the shape I glued all the sheets together using PVA (you MUST use PVA, it's NON-CORROSIVE to polystyrene unlike other glues), obviously leaving the sheet with markings on top XD "Once the PVA had dried (it never really did) I began cutting some of the excess polystyrene away with a saw. Using a saw will save you lots of time just don't cut close to the line - probably just cut 2/3 of the excess polystyrene away. I then used the Rasp for the rest of the shaping, this took away loads of polystyrene in a short time, was easy to use and got a great result (thanks Dad for suggesting it!). After using the rasp I used the electric sander to finish off the look and smooth down the edges. The pictures below show the arm at different points in the shaping, it doesn't really matter too much if the original shape is rough as you can sand it into shape.
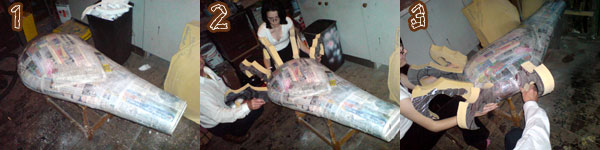
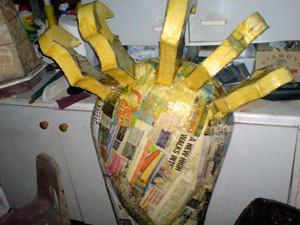
"You need to cut cut slots in to the arm where you want the claws to be, I had other people hold them in place while I had a look to see if I was happy with the positioning or not. With the claws still held in position I then drew round them on the the arm and cut out the sections for them to sit in to with a Stanley Knife. I then coated the whole arm, including claws in position, with PVA and covered it with newspaper (1-3, above). This must be done as fibreglass resin corrodes polystyrene, so 2-3 layers will be needed. Layer them up adding more coats of PVA if necessary and make sure there are no gaps. Once this is dry you're ready to fibreglass."
"IMPORTANT! Please before fibreglassing call your local boat builders/repairers, yacht chandlers or autoparts store and ask what safety equipment they use. I highly recommend you do this and get the right safety equipment for good practice. Please seek your own advice as I am not a professional and have no qualifications so cannot recommend anything.
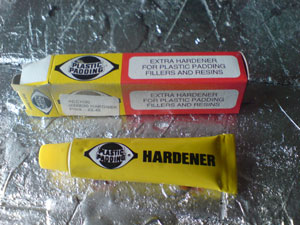
"By now you should have the arm looking nice and all covered in newspaper with no polystyrene showing. Once you have your safety equipment I'd recommend mixing your resin. If you are using the good hardener pictured (see above) you need to mix 8cm with 50ml of resin, I would recommend a weaker mix to begin with - maybe 6cm to 50ml - to give you more time for the hardener to set (you also may need to adjust the mix according to the temperature outside, if it's cold increase it, if it's hot decrease it). Ensure you mix the hardener in well with the resin, you may feel heat coming from the pot but that's just the reaction happening :P "For the next part you may want a helper (also in safety gear), I also recommend wearing old clothes. To use the fibreglass you first need to use scissors to cut the fibreglass cloth to the size of the section you wish to cover (I always cut a little bigger in case). Starting with the claws and surround, paint the part you want to cover with the resin mix then lay the fibreglass cloth on to the painted section. Then paint more mixed resin on to the cloth ensuring there are no bubbles and that there are no dry areas of cloth. Allow to dry (10 - 15 mins if mixed correctly), and once dry trim off the excess cloth. You need to repeat this process on each claw until every claw is covered."
"Then you need to reinforce the back end of the arm, leave the butt end of the arm blank, also leave a strip on the bottom side (palm) where you will insert your arm. Ensure you use regular fibreglass cloth for this part as it needs the strength. Use the above technique to cover the whole back end of the arm. Then you'll need to cover the rest of the arm (definitely a two-man job). I'd recommend doing this in two sections, top and bottom (palm and back hand), and I would do the bottom half (palm) first. Work as you did on the claws, however for a great finish you may want to only use single sheet of fibreglass cloth to the whole bottom section then once that's dry trim off any excess cloth, before using another single piece of fiberglass cloth on the top half (back hand). Ensure that it overlaps the bottom half, allow to dry then trim off any excess." Fibreglassing Complete XD
|
|
|